

This tutorial was written by me and for those
who have a good working knowledge of psp.
Supplies Needed
Tube
Artwork by ©Karen Middleton at CDO.
Font
Life Savers
Al Fresco
Filters
Filters Unlimited - Paper Textures
Richard Rosenman - Scanlines
Van Der Lee - Old Movie
...........................................................
Okay, let's get started
Remember to save often!!!
Open my template
Shift D
Close original
There are a few basic steps for this template that are repetitive.
1. Select layer
2. Float
3. Add new layer
4. Fill with color of choice
5. Apply filter of choice
6. Apply gradient glow and noise at 30 to original layer
Go HERE if you aren't familiar on my way of adding gradient glow using EC 5 Impact
Go HERE if you aren't familiar on my way of adding gradient glow using EC 5 Impact
We are going to start at the bottom layer (in layers pallet)
and work our way up the template following the steps above.Use my tag as guide if needed
Circles - #485152
Duplicate
Float
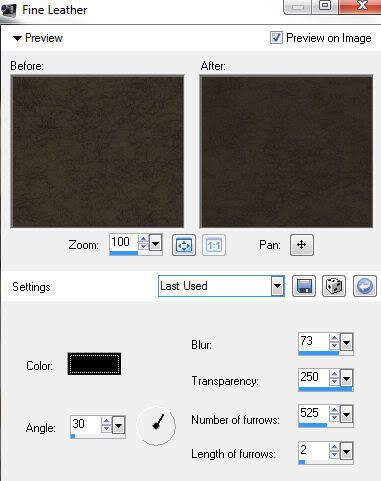
Apply fine leather
Duplicate
Float
Apply fine leather

Gray Circles - #fec974
Duplicate
Apply Old Movie filter
Change blend to Luminance (L)
Opacity at 40
Orange Squares - #b3b8b4
Duplicate
Apply FU - Striped Paper Fine
Peach - Apply FU Japanese Paper
Light Peach - Apply FU Fibrous Paper Course
Paste Tubes
Add New Layer
Move to bottom just above white bg layer
Fill with color choice
Duplicate
Apply FU - Striped Paper Fine
Peach - Apply FU Japanese Paper
Light Peach - Apply FU Fibrous Paper Course
Paste Tubes
Add New Layer
Move to bottom just above white bg layer
Fill with color choice
Apply mask
Merge group
Flipping and mirroring one of them
Add name
Add bevel if desired
Add drop shadow to layers
Add copyright info
Add copyright info
Close white bg layer
Crop and Save
Crop and Save
Very cute tutorial thank you for sharing
ReplyDeleteYou're welcome and thank you so much!
Delete