Showing posts with label Derzi. Show all posts

Tuesday, December 17, 2013

Reindeer Games

 photo reindeergames-1.png
This tutorial was written by me and for those
who have a good working knowledge of psp.

Supplies Needed


Tube
Artwork by ©Derzi 

Font
Coffee Milk Crazy
Okay, let's get started
Remember to save often!!!

Resize elements as desired

Open new canvas 800 x 800

Paste frame element 25

Using preset shape - circle draw out a circle 
the same size around as frame

Convert to raster
Float
Invert
Paste paper 45
Delete

Paste tube
Duplicate
Delete on bottom tube
Select none
Crop bottom of top tube
Make sure top tube is above frame and bottom is below

Now add elements of choice

I Used
85
93
114
123
147

Add drop shadow to layers

Add CR info

Crop & Save

Sunday, December 1, 2013

Ho Ho Ho

 photo hohoho.png
This tutorial was written by me and for those
who have a good working knowledge of psp.

Supplies Needed


Tube
Artwork by ©Derzi 

Font
(PTU) Steinweiss Script Medium

Made using the Christmas Fairy kit


Okay, let's get started
Remember to save often!!!

Resize elements as desired

Open new canvas 800 x 800

Paste cluster frame

Paste tube
I used different layers for tube options to make her like she is


Duplicate tube
Move one below frame
Erase parts on top tube layer

Add text & name on curve if desired

Add drop shadow to layers

Add CR info

Crop & Save

Friday, November 22, 2013

X-mas Cane

 photo x-mascane.png
This tutorial was written by me and for those
who have a good working knowledge of psp.

Supplies Needed


Tube
Artwork by ©Derzi 

Font
(PTU) Steinweiss Script Bold
Okay, let's get started
Remember to save often!!!

Resize elements as desired

Open new canvas 800 x 800

Paste frame element 2
Click inside frame
Expand by 4
Invert
Paste paper 30
Delete
Paste close up mirrored tube
Delete
Select none

Paste tube and move to left

Now add elements of choice from kit

I Used
1
5
12
51
53
56
86
90
96
113

Use my tag as guide if needed

Add name
I made mine on a curve but you can just rotate as wellApply bevel of choice as well

Add drop shadow to layers

Add CR info

Crop & Save

Wednesday, November 13, 2013

♥ Kawaii Love ♥

 photo kawaiilove.png
This tutorial was written by me and for those
who have a good working knowledge of psp.

Supplies Needed


Tube
Artwork by ©Ninaste 

Font
Scrap Round


Filters
Xenofex - Shower Door

Mask
Big Mask 018 by Vix


Okay, let's get started
Remember to save often!!!

Resize elements as desired

Open new canvas 800 x 800

Paste paper of choice
I used preview but applied 
xenofex - shower door to it first
Apply mask
Merge group

Paste frame element 29
Selection tool - draw out rectangle larger than the open area
Invert
Paste paper 32
I colorized my paper to match tube
Delete
Paste close up tube mirrored on right
Delete
Change blend to luminance (L)
Select none

Paste tube on left

Now add elements of choice from kit

I Used
4
12
57
71
88
123
263

Use my tag as guide if needed

Add name

Add drop shadow to layers

Add CR info

Crop & Save

Sunday, October 13, 2013

Never Give Up

 photo nevergiveup.png
This tutorial was written by me and for those
who have a good working knowledge of psp.


Supplies Needed


Tube
Artwork by ©Derzi  

Font
Ribbon Of Hope

Scrap
Filters
Eye Candy 4000 - Glass

Word Art


Okay, let's get started
Remember to save often!!!

Resize elements as desired

Open new canvas 800 x 800
Crop when finished


Paste frame 10
Select open area but a little bigger than opening
Invert
Paste paper 14
Delete
Paste tube
Duplicate
Delete on bottom tube
Select none
Crop bottom of top tube

Paste paper 10
Resize by 50%
Duplicate
Move one top left and the other bottom right of frame

Use my tag as guide if needed

Paste word art and place top right 

Paste hearts 30
Duplicate a few times and place where you like around tag 
Merge together hearts and move to bottom

Add any other elements of choice

Add name
Apply glass filter 

Add CR info

Crop & Save

Tuesday, October 8, 2013

First Love

 photo firstlove.gif

or
 photo firstlove2.gif


This tutorial was written by me and for those
who have a good working knowledge of psp.


Supplies Needed


Tube
Artwork by ©Derzi  
Tubes are FaceBook Freebie for joining 
My Supplies

Filters Used
EC 5 Impact - Gradient Glow 
Eye Candy 4000 - Glass
Xero - Fritillary
DSB Flux - Bubbles
Nik Software - Color Efex

Animation Shop (AS)

Okay, let's get started
Remember to save often!!!

Open template and my supplies
Shift D
Close original
Delete info and text layers on template

Resize canvas to 800 x 800
Crop when tag is done

Open animation in AS


Paste my mask and move to bottom


Few repetitive steps we are going to 
do for each layer of template

1. Float
2. Add new layer
3. Fill with color
4. Apply color efex filter 
5. Apply filter or texture 
6. Select none


Settings For Filters

Color Efex
 photo nik.jpg

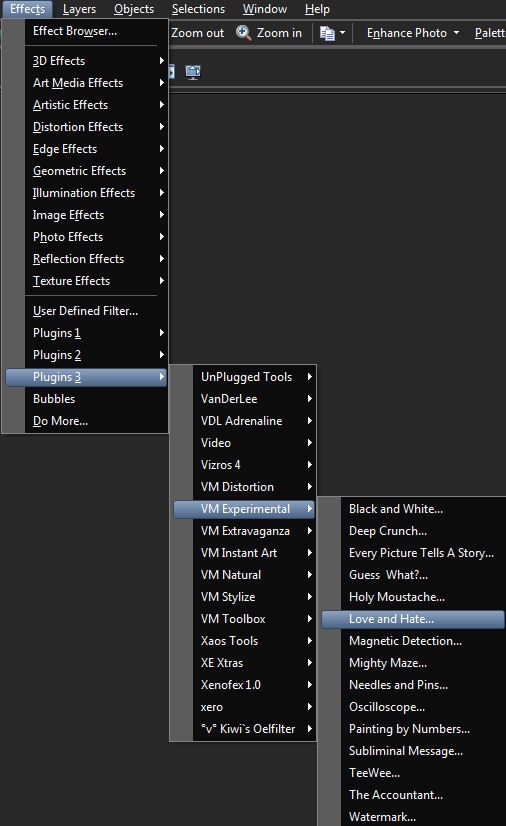
Love and Hate
 photo lovehate.jpg
 photo lovehate2.jpg

Fritillary
 photo lovehatefrit.jpg

Glass
 photo firstloveglass.jpg


Start at the bottom and work your way up template

left and right squares - #981c93 + new layer apply love & hate filter then crop to squares layer and change blend mode to luminance (L)

pink circles - gradient of #ea4775 and #c5244c

big pink circle - gradient of #fdba2d and #fef3a6

pink square - #3783b3 + fritillary filter 

left and right small circles - left #7eb7d7 and right #f0cf69 + tube

Add my supplies to tag where you like them

Paste tubes

Add name

Add copyright

Copy merge and paste into AS
If using the circle animation you need to close tube layer and then copy merge

Ctrl L until you have same amount of frames as your animation depending on which one you are doing

Ctrl A on animation and drag to tag

If using circle animation this is time to go back to PSP and copy tubes (merge together) layer and paste into AS 
and Ctrl L till you have 21 frames


Save

Saturday, September 28, 2013

Official Grand Opening at BeeHive Digital Studios

Official Grand Opening at BeeHive Digital Studios
October 1st 2013
Spend just $5.00 starting on Oct. 1st and get two amazing tubes for FREE while available
One from Ninaste and one from Derzi

Here are tags I made with both tubes


The first one is using the Ninaste tube and matching kit by Tiny Turtle Designs sold HERE

I also used animation by Simone HERE


The next one is using the adorable tube by Derzi and matching kit by Hania's Design

I also used animation by Simone HERE


Feel free to use my tags as inspiration if desired


Monday, September 23, 2013

Speed Demon

 photo speeddemon.png
This tutorial was written by me and for those
who have a good working knowledge of psp.

Supplies Needed


Tube
Artwork by ©Derzi 

Font
Calibri

Scrap
(PTU)Pumpkin by Hania's Design

Filters

Mask
Big Mask 018 by Vix

My Supplies


Okay, let's get started
Remember to save often!!!

Resize elements as desired

Use my tag as a guide if needed

Open my supplies
Copy the gradient glow pattern and paste as a new image in psp
Close GG layer in supplies
Paste paper 6
Apply mask
Merge group

Paste element 28 - mesh
Apply MM Copies - Tile
Apply mask
Merge group

Using selection tool draw out area just bigger than opening of frame
Invert
Paste paper 10
Delete

Paste element 95 - tree
Place over the tree in bg layer but have this layer on top of frame layers

Paste tube and move to right side

Now add elements of choice from kit

I Used
55
69
70
75
94

Add name
I used gradient glow pattern

Add CR info

Crop & Save