

This tutorial was written by me and for those
who have a good working knowledge of psp.
Template
Mask
Filters
EyeCandy5 Impact - Gradient Glow
Richard Rosenman - Scan Lines
Mura's Meister - Copies
Mura's Meister - Copies
Filters Unlimited 2 - Paper textures
Color Pallet I used

Okay, let's get started
Remember to save often!!!
Open template and delete info layer
Go to bottom layer and fill with white
Add new layer
Fill with gradient of choice
Apply mask
Merge group
Apply FU paper texture - striped paper
Add new layer
Fill with gradient of choice
Apply mask
Merge group
Apply FU paper texture - striped paper
Follow these steps
1. Select layer
2. Float
3. Add new layer
4. Fill with pattern or texture
5. Apply filter of choice
6. Apply gradient glow to original
6. Apply gradient glow to original
layer using color of choice and then noise at 30
Go HERE if you aren't familiar on my way
of adding gradient glow using EC 5 Impact
of adding gradient glow using EC 5 Impact
We are going to start at the bottom layer (in layers pallet)
and work our way up the template following the steps above.
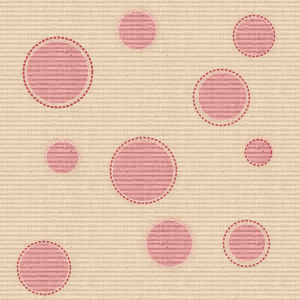
(for all) Pink colored dotted line - colorize to dark color
blue rectangles - my pattern
light blue rectangle - 3rd color in pallet
Apply FU paper texture - striped paper
light pink rectangles - gradient of dark and light
Apply texture of choice
blue circles - same gradient
Apply cirquelate filter using default setting
(for all) white dotted line - colorize to lightest color
pink shapes - darkest color
Apply paper texture - papyruslight pink circle 2 - my pattern
light blue circle - darkest color then noise at 30
white circle - lightest color
Apply scan lines using darkest color
changing top two settings to 2
light pink circle - 3rd color in pallet
Apply noise t 30
Paste tube
Add drop shadow to layers
Add name
Apply same noise
Duplicate
Rotate one left 90 degrees and one right 90 degrees
Move to left and right areas
Add copyright info
Close white layer
Crop and Save
No comments:
Post a Comment