

This tutorial was written by me and for those
who have a good working knowledge of psp.
Supplies Needed
Tubes, I used artwork by ©Suzanne Woolcott
Scrapkit, I used Just Gorjuss - Pimp'd Designz
Let's Begin!
New canvas 800 x 600.
Re-size elements as you go.
Re-size elements as you go.
Paste squares element and center in canvas.
Paste swirl 1 and duplicate.
Move one above squares layer and one below.
On top swirl layer using eraser tool start erasing
parts of the swirl so it looks as if it's weaved with squares.
Use my tag for guide if needed.
Paste mask 1 and duplicate.
Move one to left and the other to right and flip it.
Merge mask together and float the layer.
Add new raster layer and flood fill with gradient of two colors as a texture.
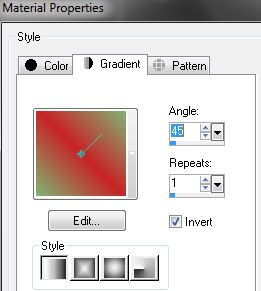

So first you make a gradient using two colors you will use in your tag.
I used #802a4b and #856382.
Then while still on gradient in material properties box
you go to the right where it says texture and
check the box and pick one of your textures.

Texture I used is HERE.
Once you have that done paste flower 3
and duplicate and move where you like them.
Paste circles 1 and after you re-size it to quite small
move to the center of your flower element.
Duplicate and place on other flower.
Paste heart 2 and move to middle of squares.
If you aren't quite sure about placement just
refer back to my tag at any time you need too.
OK now it's time to start adding the tube layers.
For mine I cropped the bottom of each tube
using the selection tool - point to point.
Make sure all tube layers are beneath the top swirl layer.
Add any wording you would like.
Convert to raster and add gradient glow 3,25,100,white.
Add drop shadow to layers of choice.
Add copyright info.
Crop any excess you may have.
Save.
No comments:
Post a Comment