This tutorial was written by me and is for those
who have a good working knowledge of psp.
Supplies Needed
Tube of choice, I used Amberly Berendson at MTA.
Font of choice, I used Yippy Skippy Alt.
Mask: WSL_mask#218
Plug-In : Mura's Meister - copies.
Open New Canvas size 700 x 650.
Paste tube layer with bg.
Crop frame - use selection tool and select
inside frame and then invert and hit delete.
Plugin : MM-copies - wallpaper (rotate)
Play around with the number settings until
you get it to look like you want. I wanted the
? part to be showing in middle.
Apply mask and merge group.
I lowered my mask layer to 30.
Paste Frame and center in canvas.
Using selection tool - point to point
draw around each square one at a time and
then invert and paste tube with bg again and
place part of it in square and hit delete.
Do this for all 3 squares.
Paste tube and position where you like her.
Look at mine as reference.
Duplicate tube and move one above
frame and one below frame.
On top tube layer using eraser tool set to
a small size (20) erase parts of tube so it looks
like she is in and out of frame.
For the boy names and heart
I just typed each name and rotated it before I
converted it to raster.
Make sure you do this while it's still
a vector layer as it makes it blurry
if you do it after.
For the heart I did same thing but used
preset shape - heart and then rotated.
For the text saying -
Set your background to one of the colors you want to use
for text. Write text and then for the different
colors there are two ways ( i use) to do this.
First way is...Highlight each letter you want as a
different color (one at a time) and change color in materials pallet.
Second way is...type text and apply changes
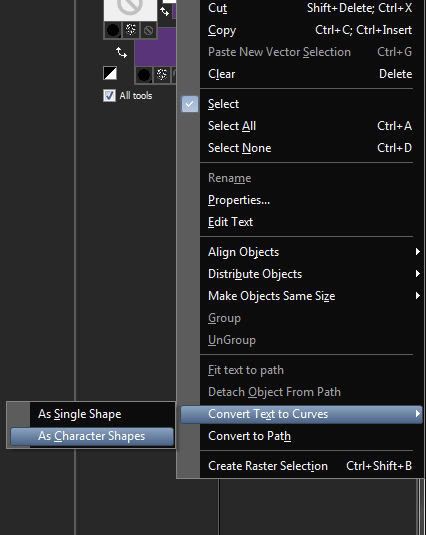
and in layers pallet open text and right click
and go down to convert text to curves
and then character shapes.
So now click the + sign and you will see
each letter by itself.
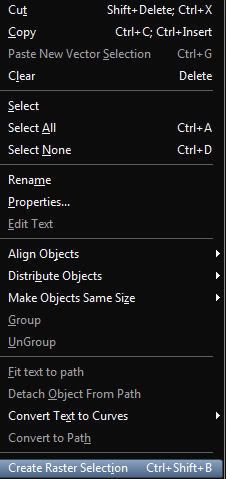
Right click each letter you want to change
and then click create raster selection
and then you can flood fill letter with
different color.
I used first way and had both my foreground and
background two colors I was using and just flipped arrow back
and forth when letters were highlighted and then for the
third color I just changed it in pallet.
Once text is how you like it convert and add dropshadow.
Add name and do the different colors again.
Convert to raster and float it.
Modify - expand by 2.
Add new raster layer and flood fill with white.
Add drop shadow and move below name layer.
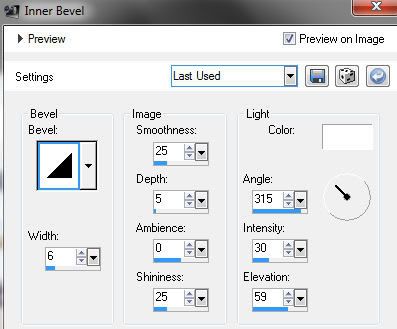
On colored name layer I used
inner bevel with these settings
Add copyright.
You are done!


No comments:
Post a Comment