

This tutorial is written for those that
have a working knowledge of PSP.
You will need...
PSP
I used X
Animation Shop
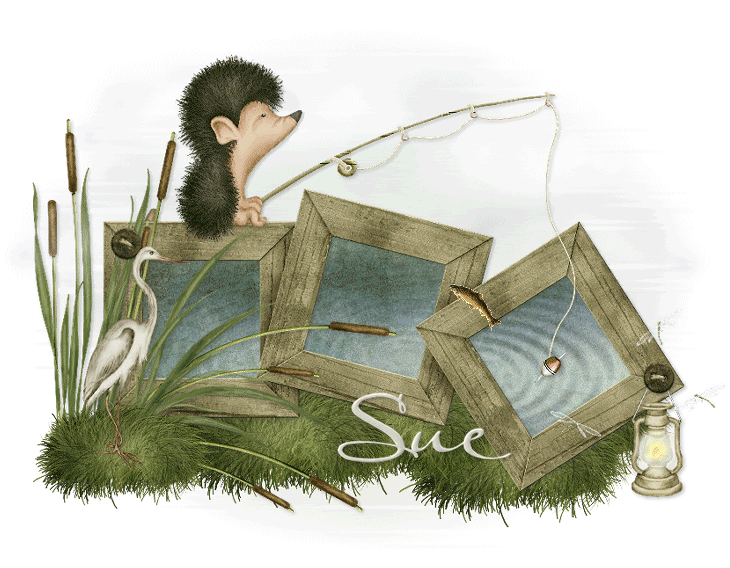
Scrap Kit
I used a totally cute scrap from
Irene Alexeeva called Fairie Lake
You can get it HERE.
Font
Ability Black
Filters Used
Eye Candy 5 Nature - Ripples
Animated Fish
Okay, let's get started.
Remember to save often!!!
Open Supplies and Minimize
Open New Canvas
700 x 700
Flood Fill
with White
Paste Paper of Choice
Resize
Apply Mask of choice
Merge Group
Paste Frame 4
Click inside each square
with Magic Wand
Modify by 4
Invert
Paste Paper 1
Resize
Duplicate Twice
so you have 3
Place Water Area in each box
Hit Delete.
Do this for all 3.
Select None
Merge All 3 Layers Together
Duplicate Twice
So you have a total of 3
On Each Layer
Effects - EC5 Nature
Ripples
Basic
Raindrops
1, 33, 1, 50, .9, 19
Make sure you click
Random Seed Button
for each Layer
Paste Lantern
Paste Button
Duplicate and Place
Paste Grass
Duplicate and Place Around
Until you get it like you like.
Use my tag as a guide if needed.
Paste HedgeHog and Fishing Pole
and make sure Pole Layer
is under the Hedgehog Layer.
Paste All Other Elements
Add Name
Add Drop Shadow To All Layers.
Go to the 3 Water Layers
Close Off 2
Copy Merged
Paste in AS
Back to PSP
Close Off Layer
that's showing
UnHide Another of the Layers
Copy Merge
Paste in AS
Repeat until all 3 Layers are in AS
Crtl A
Crtl C
Right Click on First Frame
Paste Before Current Frame
Do This Twice
so you have a total of 9 Frames
Delete First Frame
So you will have just 8
Open Animation I supplied
Crtl A
Drag to Tag and Place
where you like it.
Animation - Frame Properties
change to 20 or how you like it
Save
That's it!!!!
Hope you were able to follow along and enjoy the tutorial.


