

This tutorial was written by me and for those
who have a good working knowledge of psp.
Supplies Needed
Tube of choice, I used Artwork by ©Michael Calandra at CDO.
Font of choice, I used Roskrift Clean
Plugins of choice, I used EyeCandy 5 Nature - Smoke
and EyeCandy 4 - Gradient Glow
and EyeCandy 4 - Gradient Glow
Let's Begin!
Open my supplies and shift D.
Delete info layer
Paste your image of choice.
Place it where you like it below the frame layers
Add your name and copyright info
I applied gradient glow using 3,50,100,white
OK now time to select the part you want to animate.
Duplicate your image so you have 3 layers
Using the selection tool - point to point
outline the area and then click your smoke plugin
and use these settings
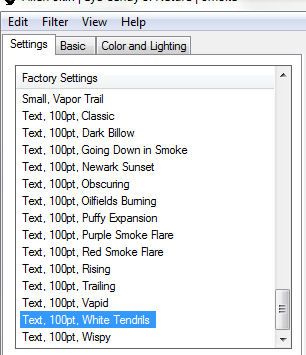
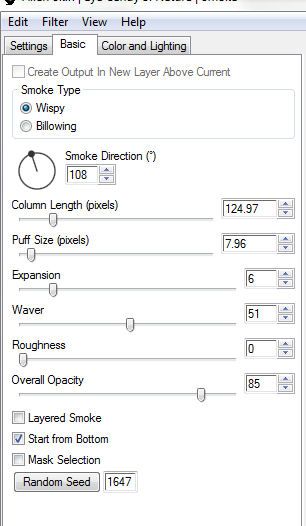
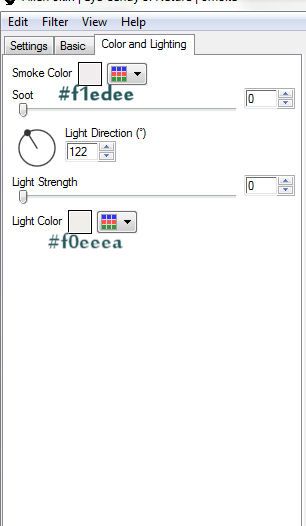
Select each image layer and apply filter but change the random seed setting for each one.
Now paste your tube and a line it with the image
I re-sized by 75%
Once you have that taken care of it's time to copy to AS.
Close 2 of the 3 image layers and copy merge and paste into AS.
Back to PSP and close the open image and open the next.
Do same steps pasting in AS and then back and do it again for other layer
Once you have all 3 in AS CTRL A and change frame properties to 75.
Save as GIF.
Open my supplies and shift D.
Delete info layer
Paste your image of choice.
Place it where you like it below the frame layers
Add your name and copyright info
I applied gradient glow using 3,50,100,white
OK now time to select the part you want to animate.
Duplicate your image so you have 3 layers
Using the selection tool - point to point
outline the area and then click your smoke plugin
and use these settings


Select each image layer and apply filter but change the random seed setting for each one.
Now paste your tube and a line it with the image
I re-sized by 75%
Once you have that taken care of it's time to copy to AS.
Close 2 of the 3 image layers and copy merge and paste into AS.
Back to PSP and close the open image and open the next.
Do same steps pasting in AS and then back and do it again for other layer
Once you have all 3 in AS CTRL A and change frame properties to 75.
Save as GIF.
No comments:
Post a Comment