

This tutorial is written for those that
have a working knowledge of PSP.
You will need...
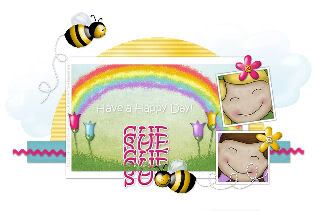
Tube of choice, I used artwork by Suzanne Woolcott
and you can purchase her work HERE.
Template #29 from Sara
You can get it HERE.
I used a FTU Scrap kit called Happy Day
and you can get it HERE
This is an fabulous kit!!!
EyeCandy 4000 - Gradient Glow
Mura's Meisters - Clouds
PhotoEffex - Scanlines
Okay, here we go...
Remember to save often!!!
Open template and shift D and close original.
Go to image / canvas size / 700 x 700
Delete top 3 Layers.
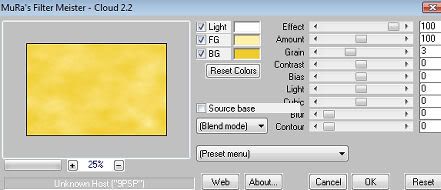
Select Half Circle Layer
Select All / Float
Mura's Meisters - Clouds
Select None.
PhotoEffex - Scanlines
Default Settings
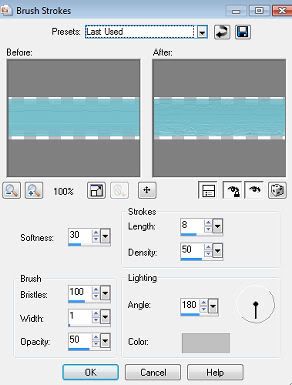
Select Long Rectangle
Select All / Float
Flood Fill - color of choice
Effects - Art Media - Brush Strokes
Select None.
Select ZigZag
Select All / Float
Flood Fill - color of choice
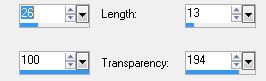
Effects - Texture Effects
Fine Leather
Select none.
Select Rectangle BG
Select all / Float / Invert
Paste Paper
Resize - Postion
Hit Delete
Add
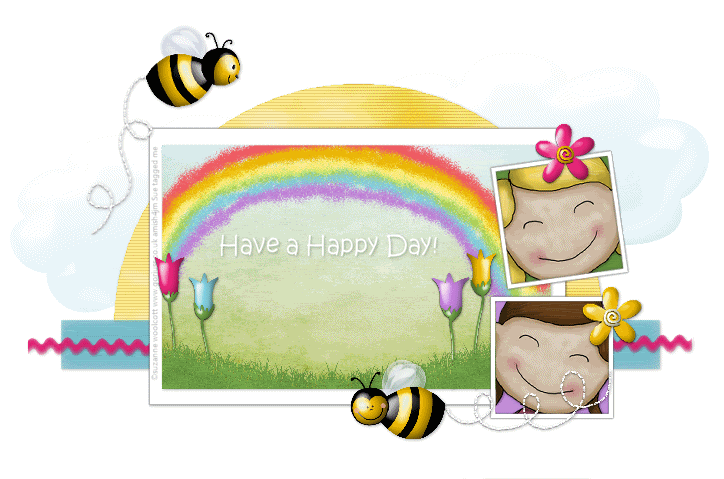
rainbow, grass, and flowers
Select Small Square Layers
Select all / Float
Flood Fill - colors of choice
Paste Tubes
Resize - Postion
Hit Delete
Select None.
Add Elements of Choice
(clouds, bees, trails, flowers)
Add Saying of Choice
Add Drop Shadow
to Layers
Add Name
Add Copyright.
Save as desired.
~~~~~~~~~~~~~~~~~~~~~
To Animate Name
~~~~~~~~~~~~~~~~~~~~~~
Make Sure Name Layer is Below the Grass Layer
Duplicate Name 5 times so you have a toltal of 6 Layers
Postion Top Layer where you want tag to End Up
On Each Layer Below Move Down
Untill Last Layer is barely showing.
Select Rectangle Layer
Select All - Float - Invert
Back to Name and Hit Delete
On All Name Layers
Close Off Top 5 Name Layers
Edit - Copy Merge
Paste in Animation Shop
Back To PSP
Close Off 6th Layer
Unhide 5th Layer
Edit - Copy Merge
Paste in Animation Shop
Continue This untill all are in AS
Last Layer - Right Click
Frame Properties 200
Save as a Gif.
have a working knowledge of PSP.
You will need...
Tube of choice, I used artwork by Suzanne Woolcott
and you can purchase her work HERE.
Template #29 from Sara
You can get it HERE.
I used a FTU Scrap kit called Happy Day
and you can get it HERE
This is an fabulous kit!!!
EyeCandy 4000 - Gradient Glow
Mura's Meisters - Clouds
PhotoEffex - Scanlines
Okay, here we go...
Remember to save often!!!
Open template and shift D and close original.
Go to image / canvas size / 700 x 700
Delete top 3 Layers.
Select Half Circle Layer
Select All / Float
Mura's Meisters - Clouds

Select None.
PhotoEffex - Scanlines
Default Settings
Select Long Rectangle
Select All / Float
Flood Fill - color of choice
Effects - Art Media - Brush Strokes

Select None.
Select ZigZag
Select All / Float
Flood Fill - color of choice
Effects - Texture Effects
Fine Leather

Select none.
Select Rectangle BG
Select all / Float / Invert
Paste Paper
Resize - Postion
Hit Delete
Add
rainbow, grass, and flowers
Select Small Square Layers
Select all / Float
Flood Fill - colors of choice
Paste Tubes
Resize - Postion
Hit Delete
Select None.
Add Elements of Choice
(clouds, bees, trails, flowers)
Add Saying of Choice
Add Drop Shadow
to Layers
Add Name
Add Copyright.
Save as desired.
~~~~~~~~~~~~~~~~~~~~~
To Animate Name
~~~~~~~~~~~~~~~~~~~~~~
Make Sure Name Layer is Below the Grass Layer
Duplicate Name 5 times so you have a toltal of 6 Layers
Postion Top Layer where you want tag to End Up
On Each Layer Below Move Down
Untill Last Layer is barely showing.

Select Rectangle Layer
Select All - Float - Invert
Back to Name and Hit Delete
On All Name Layers

Close Off Top 5 Name Layers
Edit - Copy Merge
Paste in Animation Shop
Back To PSP
Close Off 6th Layer
Unhide 5th Layer
Edit - Copy Merge
Paste in Animation Shop
Continue This untill all are in AS
Last Layer - Right Click
Frame Properties 200
Save as a Gif.
No comments:
Post a Comment