
This tutorial is for those with a good working knowledge of psp.
Supplies Needed
Tubes of choice, I used artwork by Ismael Rac.
Scrapkit, "ORD (Obsessive Rac Disorder)" from Creationz by Jo.
Font of choice, I used Teeny Boppin NF (PTU).
Template, I used Template #271 from Missy.
Mask, I used GemsMask41.
Plug-In : EyeCandy 4000 : Gradient Glow
Xero : Porcelain
Penta : Color Dots
Let's Begin!
Open Template
Shift D
Resized Canvas to 800 x 700
This will give you room to move around
but don't forget to crop/resize when done.
Delete the copyright layer.
On bottom layer, selections and float image and then defloat image.
New raster layer and flood fill with color of choice. I used #cf5c9e.
Change blend mode to Multiply.
Add noise with these settings : uniform, monochrome, 35.
On the small circle bg layers, float and invert and paste tubes you are using and hit delete and select none.
I used Xero : Porcelain (default setting) on tubes.
Pick a color from tube and change circle bg, pink ring, and white layers.
I used #ca86ae for bg, #cf5c9e for pink ring, and black for the white layer.
Select bottom white circle, select and float image.
Add new raster layer and flood fill with color and then modify, contract by 6 and hit delete. I used black.
Move it above the pink half circle so it becomes a frame of sort.
Apply gradient glow with setting 3, 25, 100 medium glow with color of choice. I used #cf5c9e.
Add noice with same setting.
On the top white circle, selections and float image and then defloat and invert.
Paste paper of choice and hit delete. Select none. I used paper # 17.
Select pink half circle and float image and defloat.
New raster layer and fload fill with color. I used #2da5c9.
Apply penta : color dots with setting of 90, 8, 255, 255, 255.
On the rectangle layers, selections and float image and add new raster layer and flood fill with color.
Add gradient glow and noice.
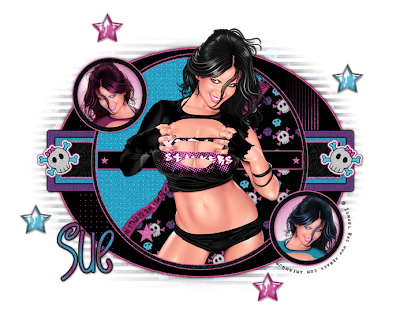
Use my tag for example.
On stars layer I just changed color to #ca86ae.
Add elements of choice.
Paste paper and move to bottom and apply mask.
I used same paper as before.
Add main tube and duplicate. Move bottom tube below the circle frame we made.
Select the circle layer and float and invert it and then back to bottom tube and hit delete.
Select none.
On top tube layer crop excess off. So it should be smooth at bottom and nothing showing.
Look at mine for example.
For name I used #cf5c9e and #2aa2c6 as a gradient with setting of angle 45, repeats 4.
Then applied gradient glow of black and added noise.
Add dropshadow to all layers.
Add copyright.
You are done!
Supplies Needed
Tubes of choice, I used artwork by Ismael Rac.
Scrapkit, "ORD (Obsessive Rac Disorder)" from Creationz by Jo.
Font of choice, I used Teeny Boppin NF (PTU).
Template, I used Template #271 from Missy.
Mask, I used GemsMask41.
Plug-In : EyeCandy 4000 : Gradient Glow
Xero : Porcelain
Penta : Color Dots
Let's Begin!
Open Template
Shift D
Resized Canvas to 800 x 700
This will give you room to move around
but don't forget to crop/resize when done.
Delete the copyright layer.
On bottom layer, selections and float image and then defloat image.
New raster layer and flood fill with color of choice. I used #cf5c9e.
Change blend mode to Multiply.
Add noise with these settings : uniform, monochrome, 35.
On the small circle bg layers, float and invert and paste tubes you are using and hit delete and select none.
I used Xero : Porcelain (default setting) on tubes.
Pick a color from tube and change circle bg, pink ring, and white layers.
I used #ca86ae for bg, #cf5c9e for pink ring, and black for the white layer.
Select bottom white circle, select and float image.
Add new raster layer and flood fill with color and then modify, contract by 6 and hit delete. I used black.
Move it above the pink half circle so it becomes a frame of sort.
Apply gradient glow with setting 3, 25, 100 medium glow with color of choice. I used #cf5c9e.
Add noice with same setting.
On the top white circle, selections and float image and then defloat and invert.
Paste paper of choice and hit delete. Select none. I used paper # 17.
Select pink half circle and float image and defloat.
New raster layer and fload fill with color. I used #2da5c9.
Apply penta : color dots with setting of 90, 8, 255, 255, 255.
On the rectangle layers, selections and float image and add new raster layer and flood fill with color.
Add gradient glow and noice.
Use my tag for example.
On stars layer I just changed color to #ca86ae.
Add elements of choice.
Paste paper and move to bottom and apply mask.
I used same paper as before.
Add main tube and duplicate. Move bottom tube below the circle frame we made.
Select the circle layer and float and invert it and then back to bottom tube and hit delete.
Select none.
On top tube layer crop excess off. So it should be smooth at bottom and nothing showing.
Look at mine for example.
For name I used #cf5c9e and #2aa2c6 as a gradient with setting of angle 45, repeats 4.
Then applied gradient glow of black and added noise.
Add dropshadow to all layers.
Add copyright.
You are done!
No comments:
Post a Comment